Shibuya Crossing: Tips for the Best Photos


If Tokyo had a heartbeat, it would be Shibuya Crossing.
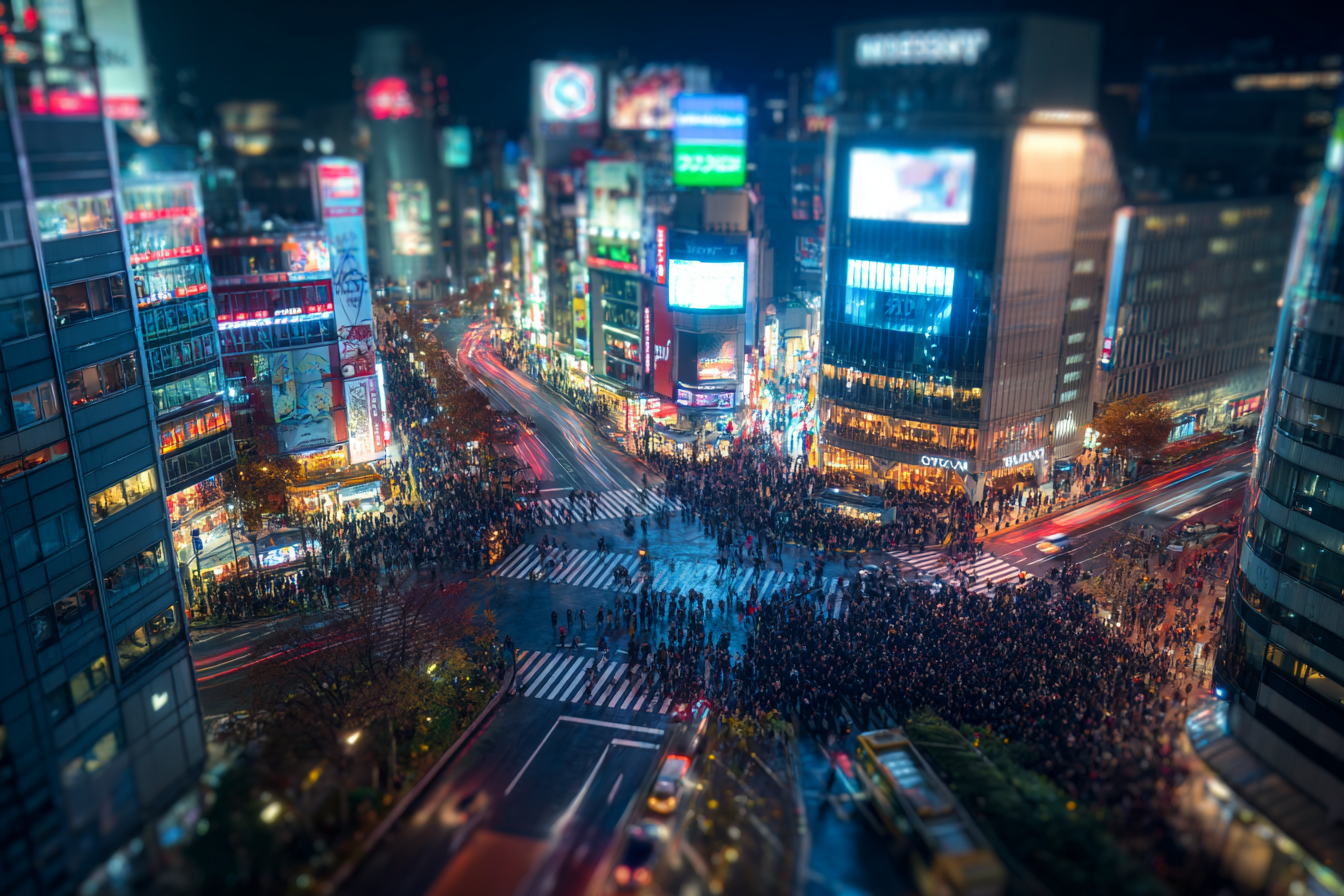
Up to 3,000 people cross at once during peak cycles. Neon screens flash. Trains rumble underneath. And yet somehow — it all works.
For photographers, it’s controlled chaos.
For first-time visitors, it’s overwhelming.
For you? It’s about getting the shot.
Here’s exactly how to photograph Shibuya Crossing like a pro — whether you’re carrying a DSLR or just your phone.
1. Best Time to Shoot (Lighting Changes Everything)
🌇 Golden Hour (Seasonal ~5–7 PM)
Soft sunlight hits the buildings. Neon signs begin glowing. Crowds build naturally.
This is the sweet spot for:
- Balanced exposure
- Warm city tones
- Cinematic contrast
Arrive 45–60 minutes before sunset.
🌃 Night (7–10 PM)
Classic Tokyo vibe.
- Neon billboards explode in color
- Cars create light trails
- Crowds blur beautifully
Best for long exposure photography.
🌤 Early Morning (6–8 AM)
If you want cleaner compositions:
- Fewer tourists
- Softer shadows
- Easier framing
It feels almost surreal seeing it quiet.
🌧 Rainy Evenings (Underrated!)
Wet pavement reflects neon lights.
You’ll get Blade Runner vibes instantly.
Bonus: Slightly thinner crowds.
2. Best Photo Spots (From Free to Premium Views)
📍 Ground Level – Hachiko Side
Hachiko Statue
- Free
- Immersive
- Best for in-the-action shots
Cross multiple times. Shoot from corners.
Selfies here are iconic — but never stop mid-crossing.
☕ Starbucks (QFront Building)
- Buy a drink (~¥500)
- 2nd floor window view
- Great for overhead crowd shots
Arrive early for window seats.
Tripods not allowed.
🏙 Magnet by Shibuya 109 Rooftop (Mag’s Park)
Mag’s Park Rooftop
- Entry: ~¥600
- Open-air platform
- Cleaner angle than Starbucks
Fantastic at dusk for shadow patterns.
🌆 Shibuya Sky Observatory
Shibuya Sky
- 46th floor
- ¥2,000–2,500
- 360° panoramic Tokyo view
On clear days, you might even spot Mount Fuji in the distance.
Best for:
- Aerial compositions
- Wide cityscapes
- Epic skyline shots
Book online in advance.
🚶 Station Overhead Walkway (Free Secret Spot)
Inside Shibuya Station:
- Elevated angle
- Less crowded
- Quick snaps without spending money
A surprisingly underrated option.
3. Camera Settings & Techniques


📸 For DSLR / Mirrorless
Long Exposure (Night Classic)
- Shutter: 5–20 seconds
- ISO: 100–400
- Tripod required (rooftops only)
Result:
- Blurred pedestrians
- Neon light streaks
- Cinematic movement
Wide-Angle Drama
- 16–35mm lens ideal
- Shoot from lower perspective
- Emphasize crosswalk stripes
Low angles create depth and energy.
📱 For Smartphone
- Use burst mode for motion moments
- Use night mode after dark
- Try time-lapse for crossing cycles
- Lock exposure manually if possible
Apps like Slow Shutter Cam help simulate long exposures.
4. Composition Tips That Elevate Your Shots
- Shoot from corners, not center
- Use crosswalk lines as leading lines
- Include billboards for scale
- Capture 2–3 crossing cycles
- Wait for umbrella symmetry in rain
Patience wins here.
5. Safety & Etiquette (Important)
- ❌ Never stop mid-crossing
- ❌ Don’t film while walking blindly
- ❌ No drones without permission
- ✔ Stay on sidewalks when shooting
- ✔ Respect privacy — avoid close-ups without consent
Tokyo flow is smooth because people cooperate. Be part of that system.
6. Editing for That “Tokyo Pop”
After shooting:
- Increase contrast slightly
- Boost vibrance (carefully)
- Cool shadows slightly for neon mood
- Add subtle motion blur for dramatic effect
Don’t overdo HDR — neon should glow, not explode.
7. Combine Nearby Spots
Enhance your shoot with:
- Miyashita Park for urban rooftop contrast
- Center-Gai for neon street scenes
- Backstreets for quieter Tokyo moments
Shibuya isn’t just one intersection — it’s an ecosystem of energy.
Final Advice
Shibuya Crossing isn’t about perfection.
It’s about rhythm.
Stay longer than you think.
Shoot multiple angles.
Wait for the right crossing wave.
And when the lights turn red and the crowd surges forward?
That’s your moment.
Tokyo doesn’t repeat itself. 📸